
Guide to Registering for Classes

This webpage has detailed instructions for using the new, upgraded registration interface. (The old “classic” registration interface was retired on May 27, 2025.)
- For a shorter summary of these instructions, consult the Quick-Start Guide
- Check for "holds" on your account by following the Prepare to Register instructions below
Need Assistance?
If you'd like in-person assistance with the new registration system, visit the Admissions and Records Office. They're available on Zoom or in person on the first floor of the RSS Building, across the hall from the Bookstore.Before You Begin
- Check the main Registering for Classes webpage to make sure you've satisfied all preliminary requirements and are ready to use the class registration system.
- Visit the Academic Calendar webpage to find important dates and deadlines, including add and drop periods, final exam schedule and holidays.
- For disability accommodations, including admissions and course registration assistance, contact Disability Support Services.
- Watch this helpful video! (Find more videos at deanza.edu/vhs-guide)
Prepare to Register
Get Your Date to Register and Check for Any Holds on Your Account

Here are some steps you can take to find your registration date and make sure you don't have any holds that will prevent you from registering.
Log In Through MyPortal
 Use your web browser to go to https://myportal.fhda.edu.
- Log in to your MyPortal account.
- Click on the card for Student Registration
When the Student Registration page opens on your screen, look in the upper left and click the blue link for the Registration Dashboard.
(The previous registration interface, known as "classic," is no longer available for use. It was removed on May 27, 2025.)
![]()
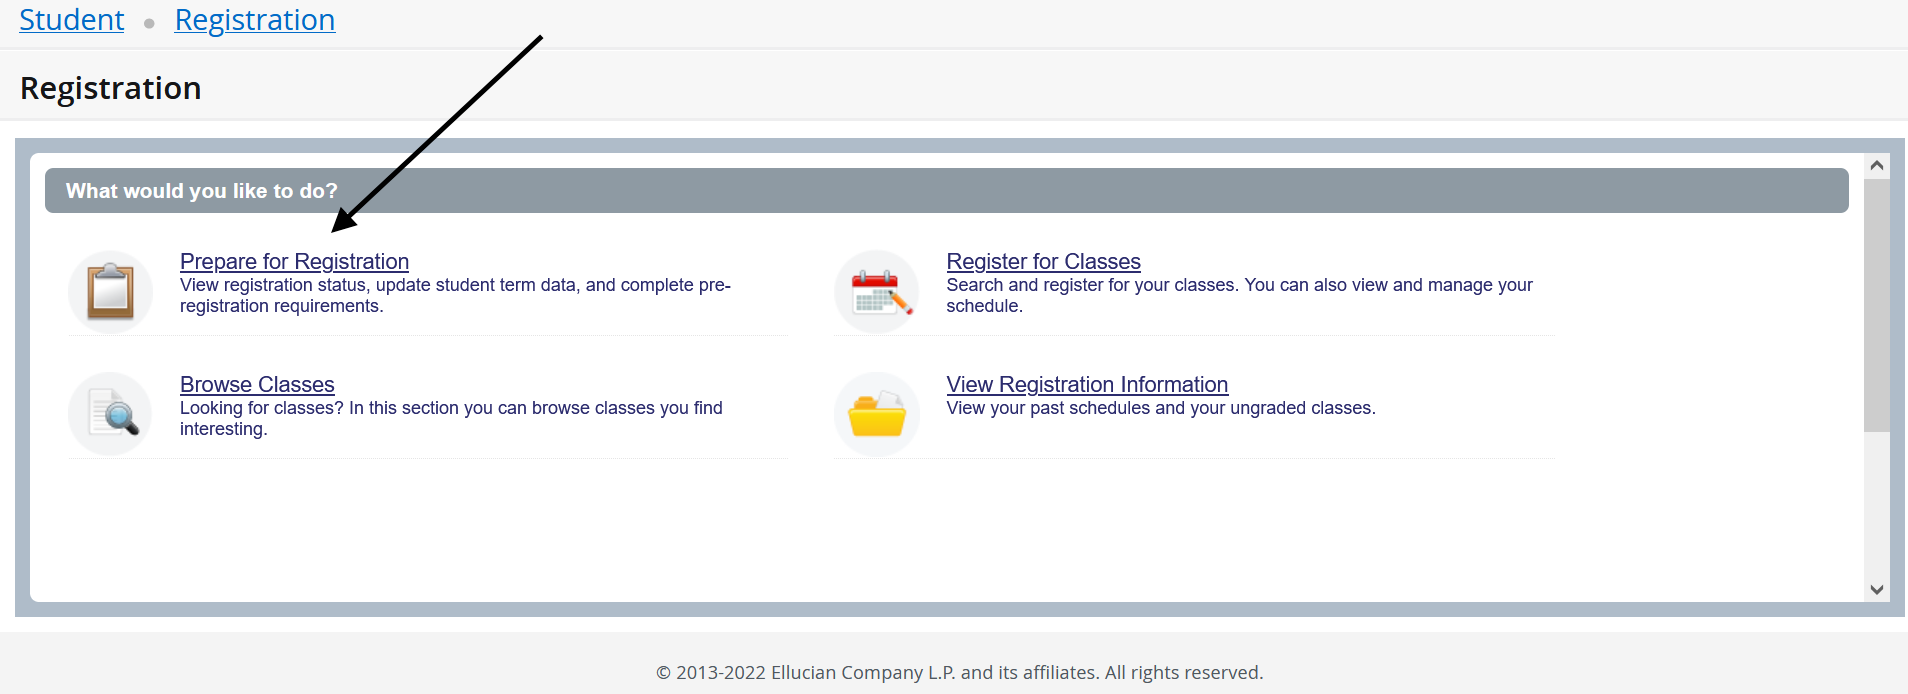
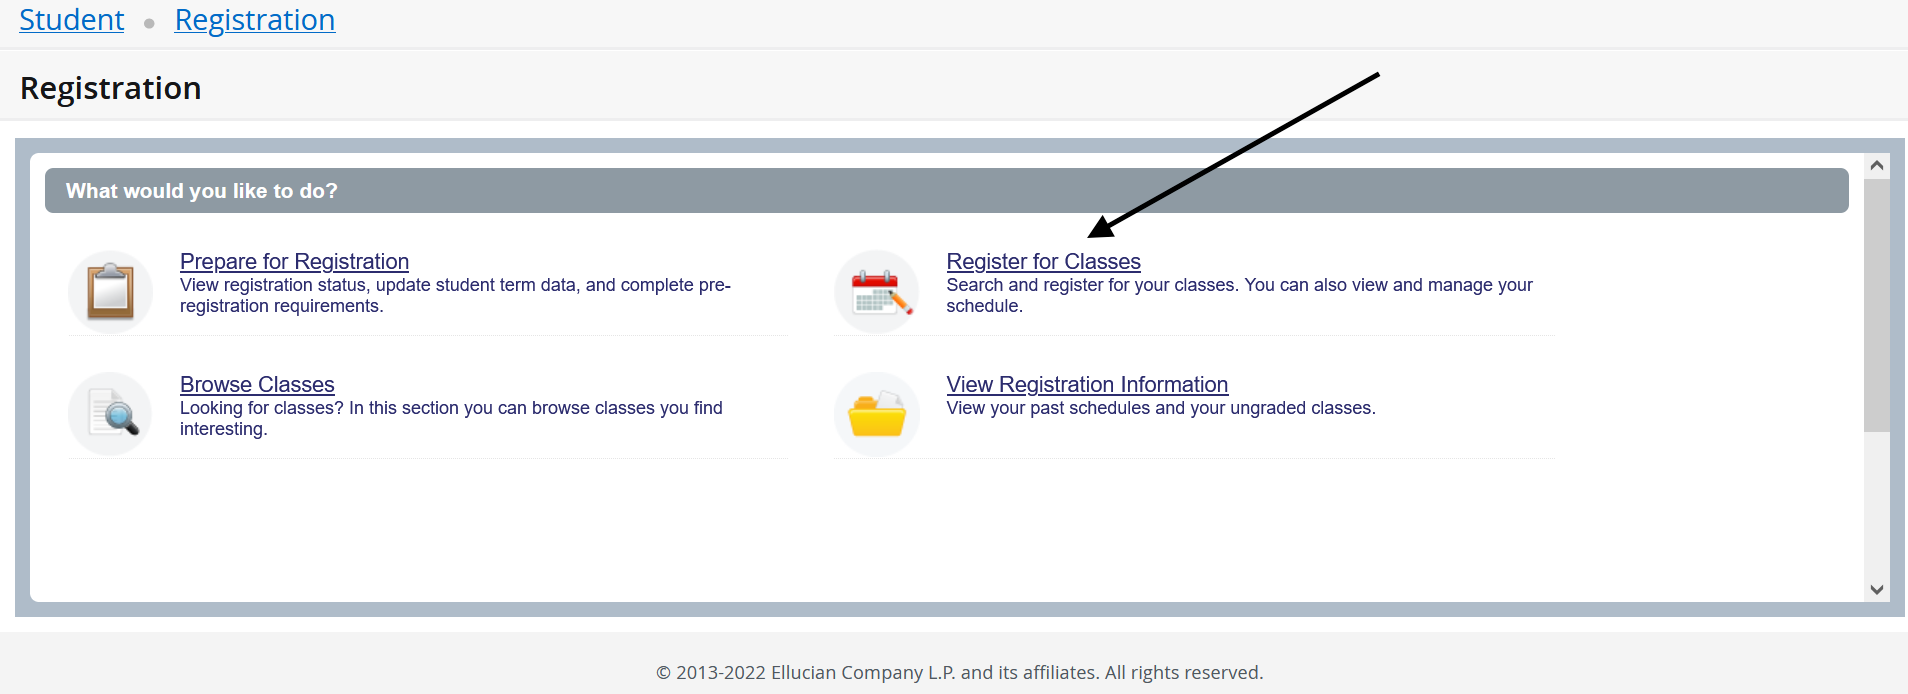
Start With the Registration Page
When the Registration page opens, click on Prepare for Registration again.
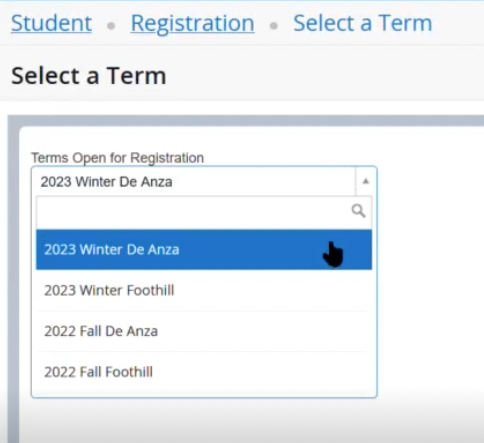
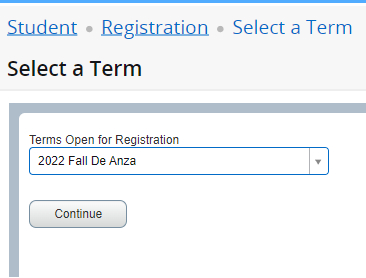
Select a Term
Select the quarter or session for which you are registering, and click Continue.
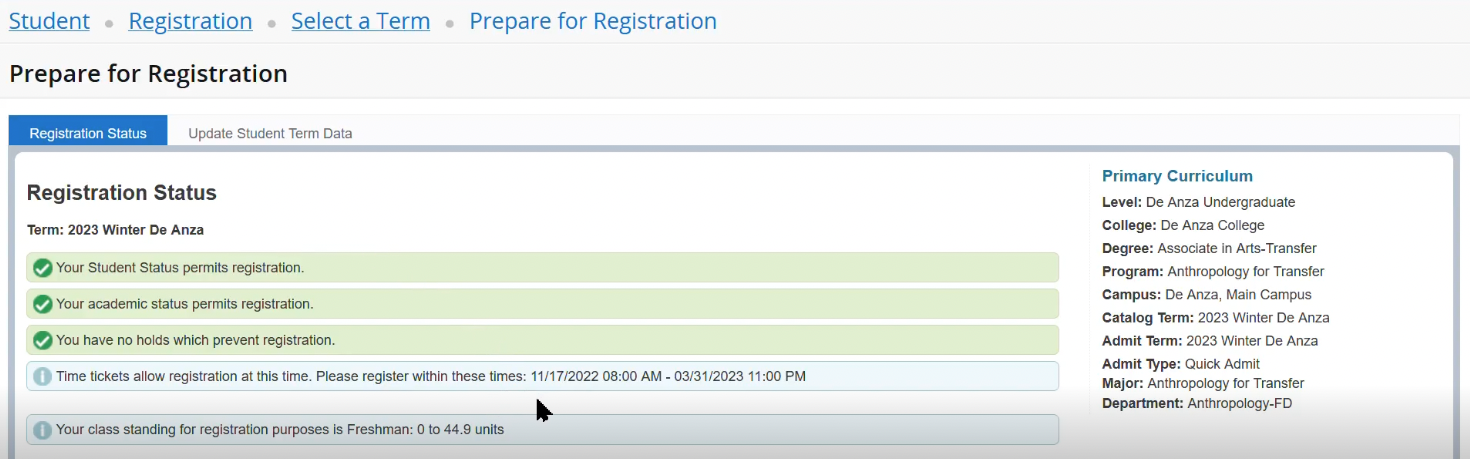
Check Your Registration Date and Status
When the next screen opens, take note of your registration time ticket – this shows the date when you can begin registering for classes – and check to make sure you have no holds that would prevent you from registering.
- If you have a hold, you will need to contact the Admissions and Records Office to find out how you can have it cleared.
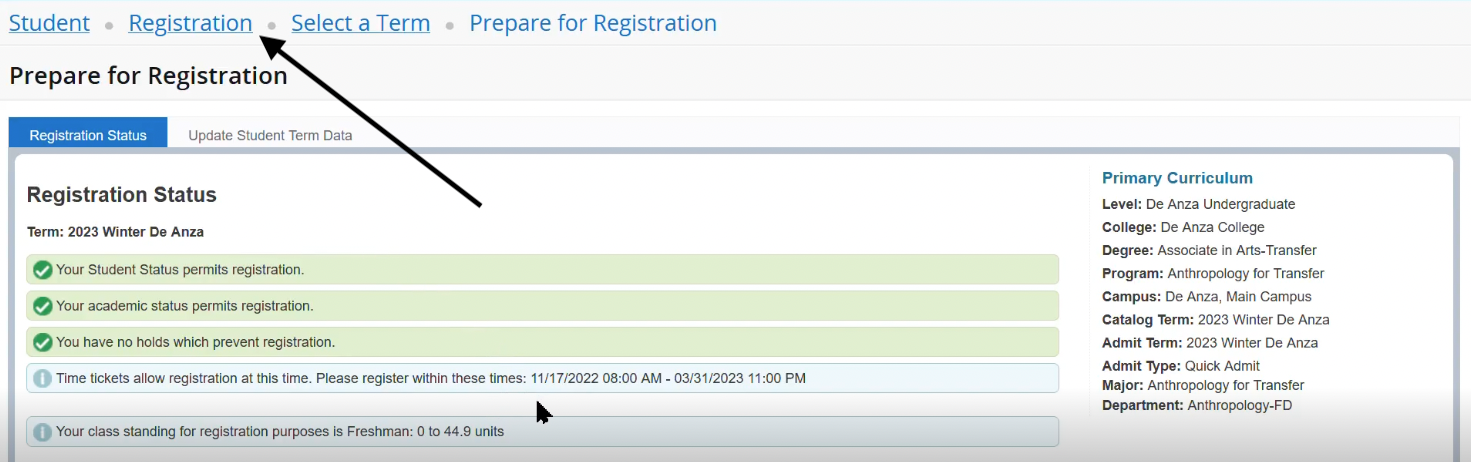
Return to the Registration Page
Now you're ready to return to the main Registration page: Click the Registration link at the top of your screen.
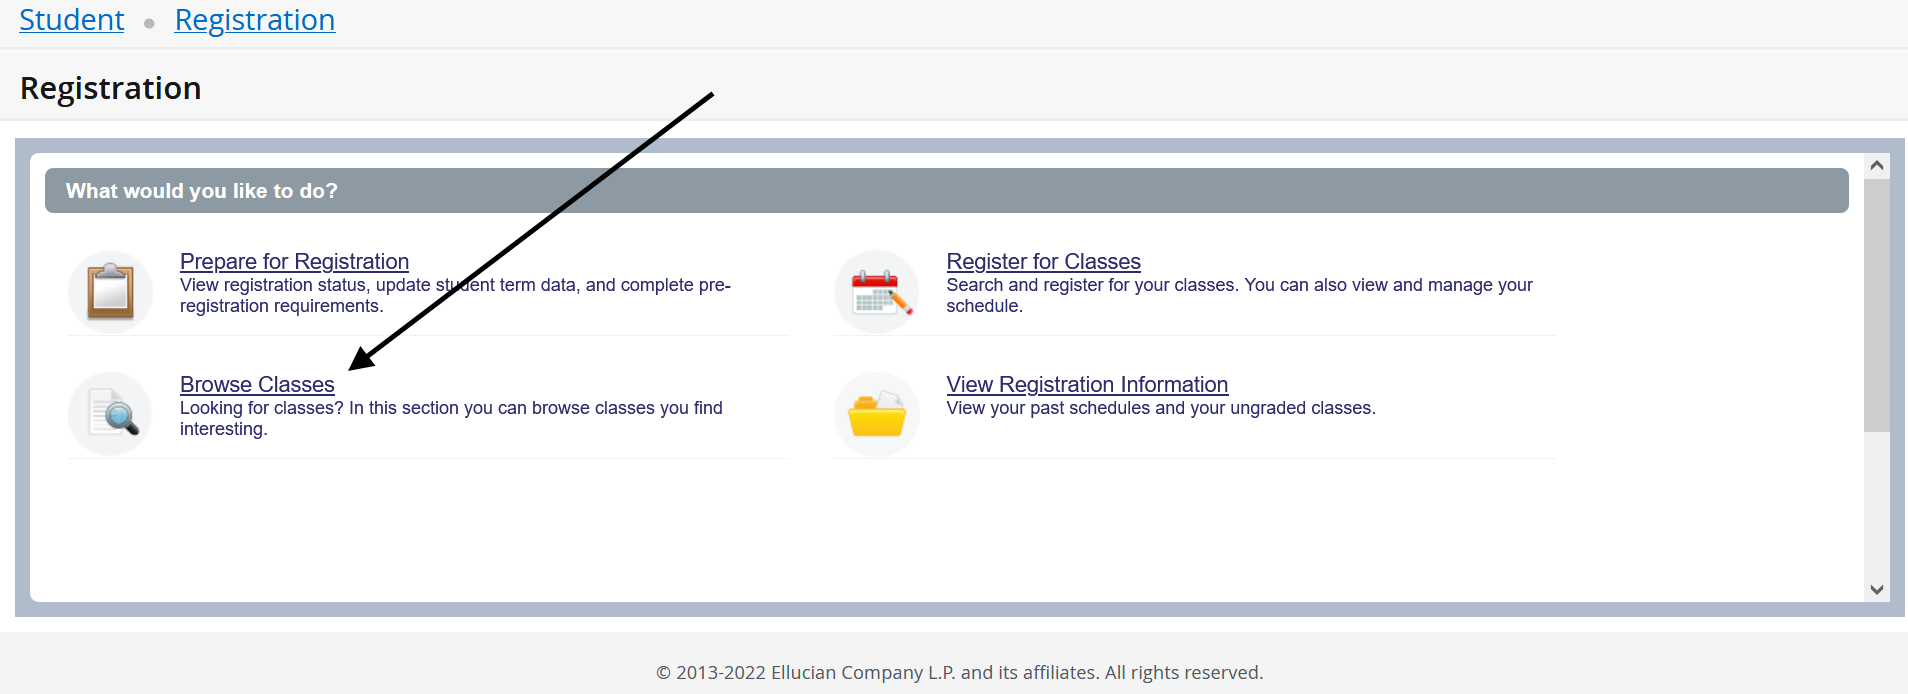
Browse Classes

The Browse Classes feature allows you to search for classes in different subject areas. You can make note of the CRN (Course Registration Number) so you can find or add the class later.
Log In Through MyPortal
Use your web browser to go to https://myportal.fhda.edu.
- Log in to your MyPortal account.
- Click on the card for Student Registration
When the Student Registration page opens on your screen, look in the upper left and click the blue link for the Registration Dashboard.
(The previous registration interface, known as "classic," is no longer available for use. It was removed on May 27, 2025.)
![]()
Open the Browse Classes Page
Once you have logged in to the registration system (see the steps above) and have opened the main Registration page, you can click on the link to Browse for Classes.
Select the Term
Select the quarter or session for which you are registering, and click Continue.
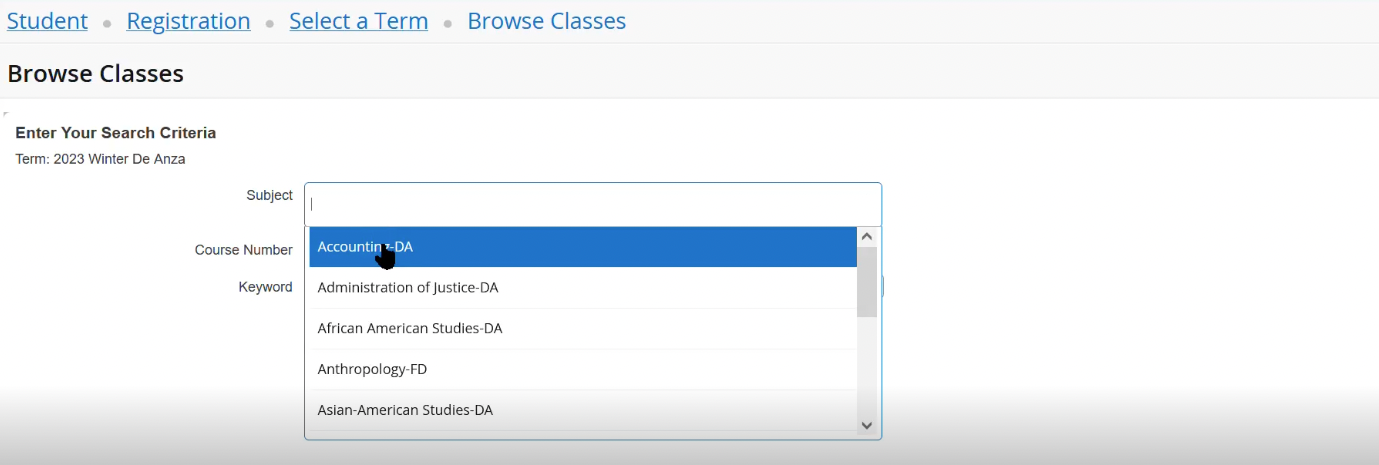
Search by Subject
When the search page opens, you can find classes by searching for the subject you want.
- Use the dropdown menu or type in the subjects. (You can search for multiple subjects at the same time, if you wish.)
- Click on the Search button to see a list of classes in the subject you want.
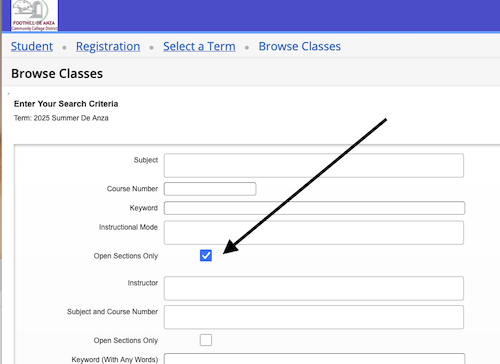
Search for Open Classes
When you search for classes, you can also filter your search so that only open course sections are displayed in the results. Do this by checking the box for "Open Sections Only."
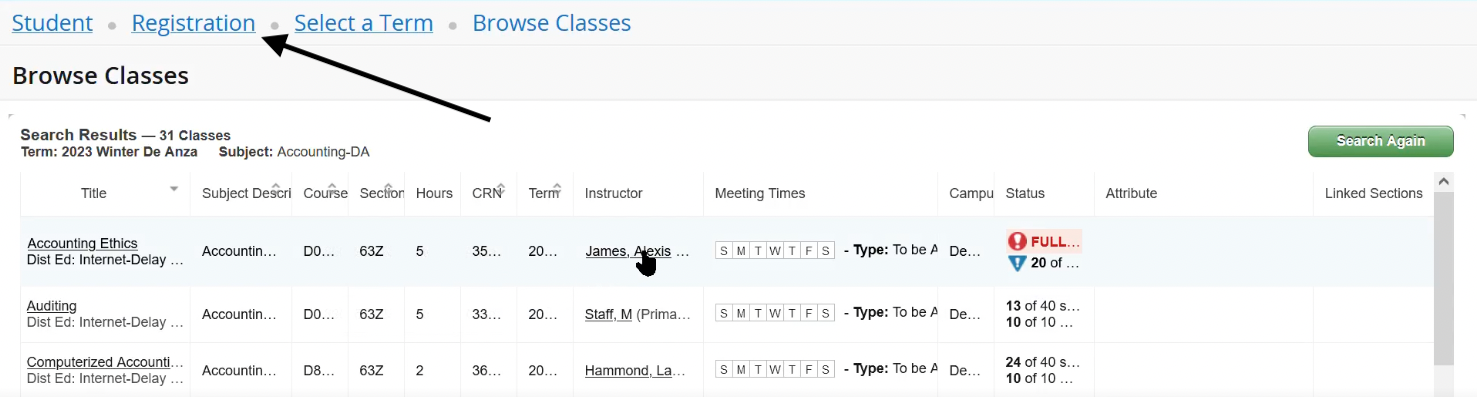
View Search Results
After you click the Search button, a list of classes will appear on your screen.
- You can make any column wider or narrower by holding your cursor on the dividing line and moving to the right or left.
- Check each column for helpful information.
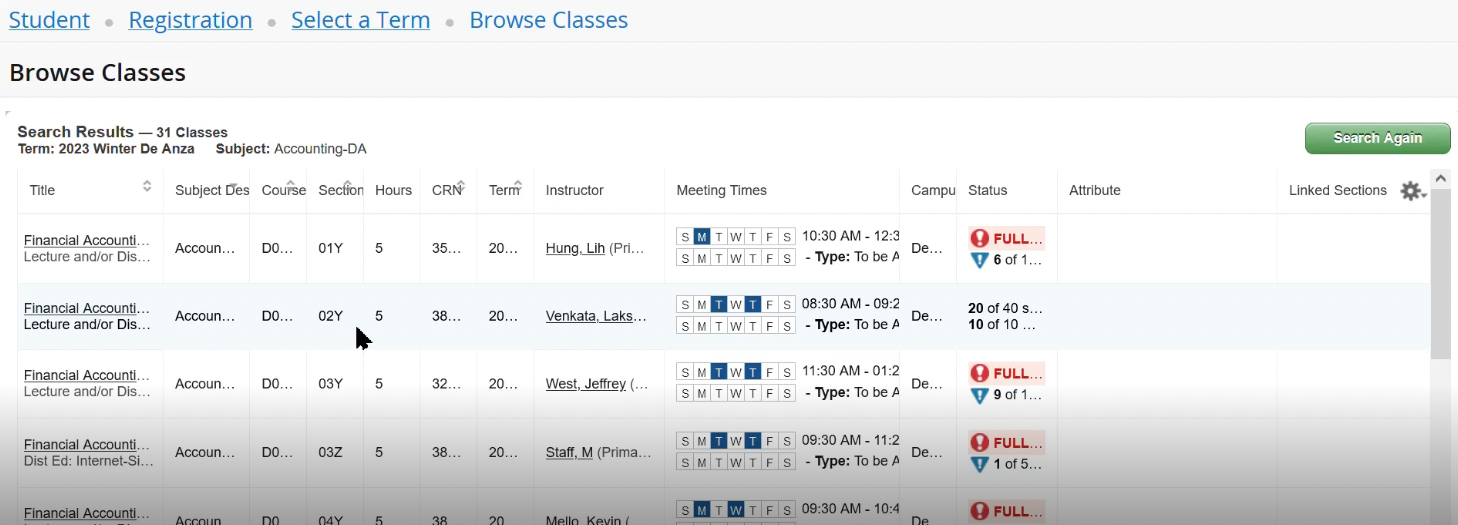
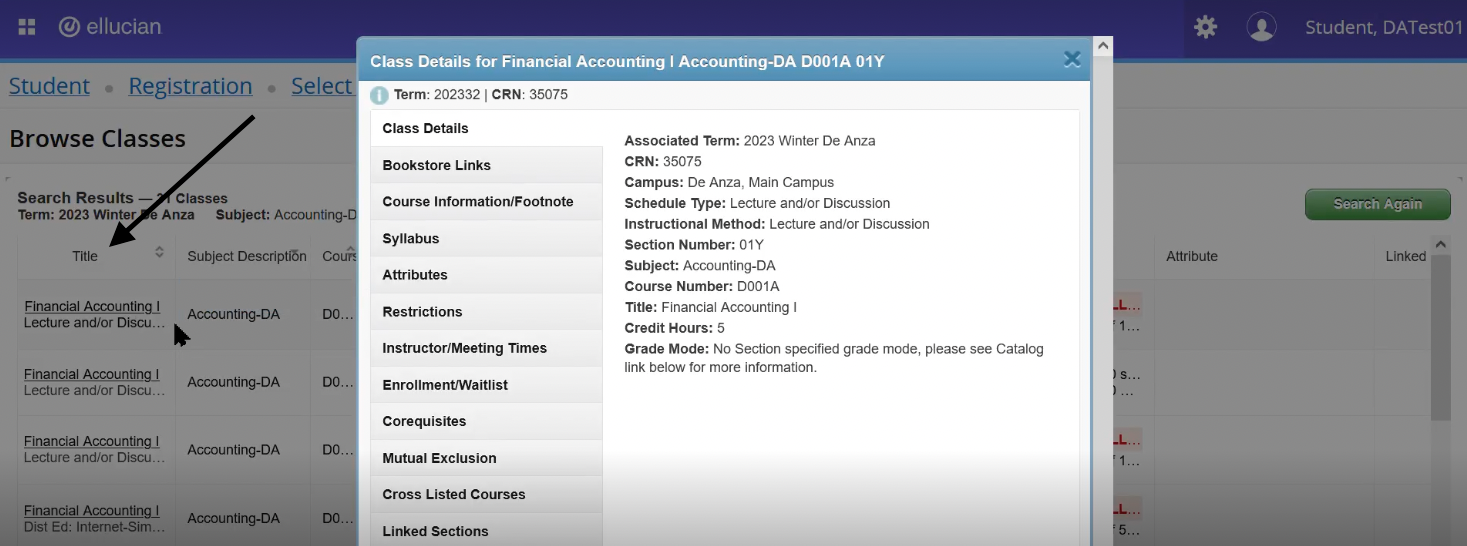
Get Class Information
- Click on the course title in the left-hand column to open a box containing more information about the class, including required textbooks, prerequisites and other helpful details.
- While the box is open, you can click on each item in the left-hand column to see more details.
- Be sure to read the footnotes for details on how the class will be taught, such as
- Whether it will be taught on campus or online – or as a hybrid class that includes both on-campus and online instruction
- Whether online classes will have regularly scheduled meeting times, some scheduled meetings, or no regularly scheduled meetings, with students completing weekly assignments on their own time.
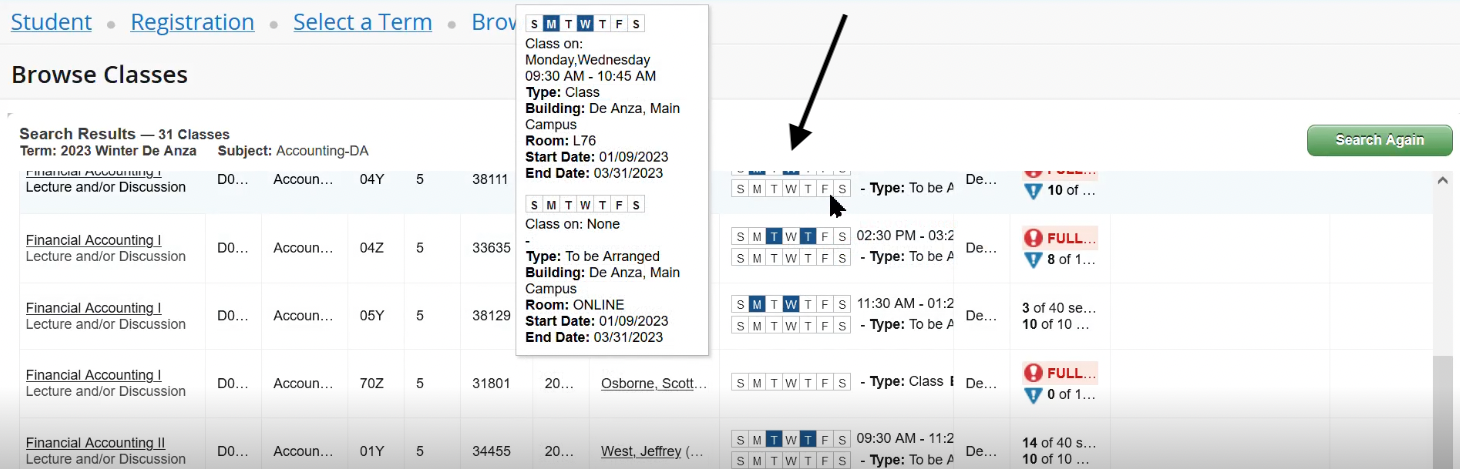
Get Schedule Information
Look in the Meeting Times column and click on the entry for each class listed to see more details about the days, times and location of class meetings, as well as the starting and ending dates.
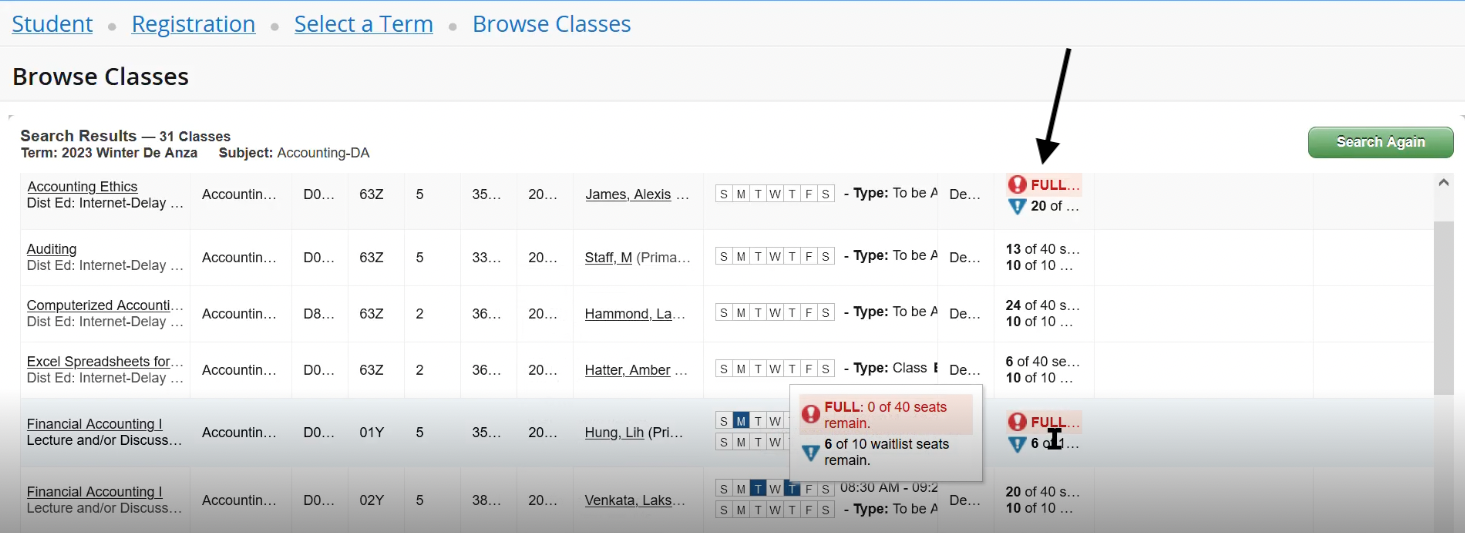
Get Seats and Waiting List Information
Look in the Status column and click on the entry for each class to see details about seat availability and, if the class is closed, spaces on the waiting list.
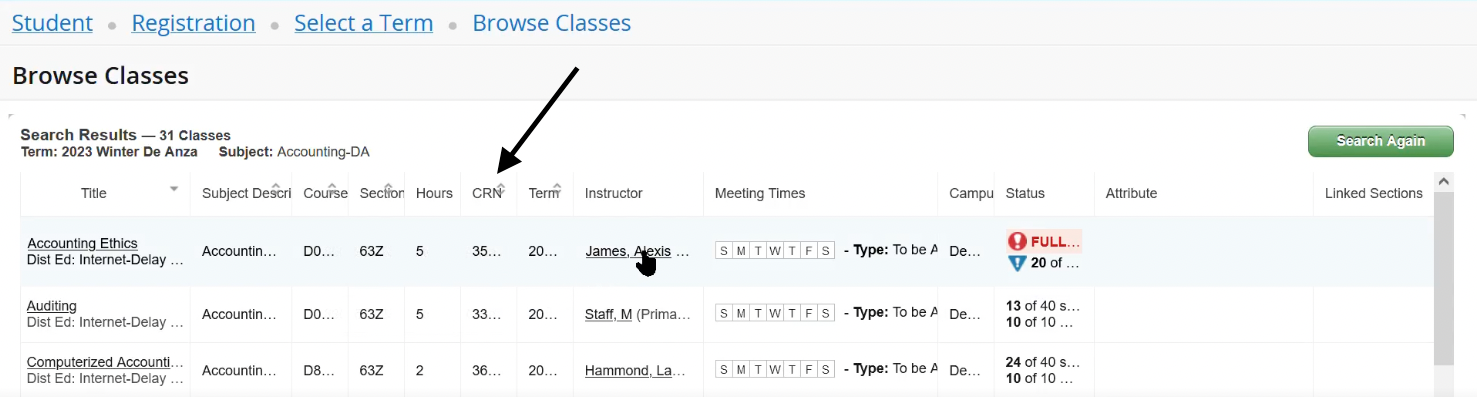
Make Note of the CRN
Write down the CRN for any class you want to take.
- Look in the CRN column for the five-digit Course Reference Number.
- You may need to widen the CRN column to read the whole number: Hold your cursor on the column divider and move to the right or left.
- Once you have the class CRN, you can add the class by following Step 7 under Register for Classes, lower on this page.
Return to the Registration Page
When you're ready to return to the main Registration page, click the Registration link at the top of your screen.
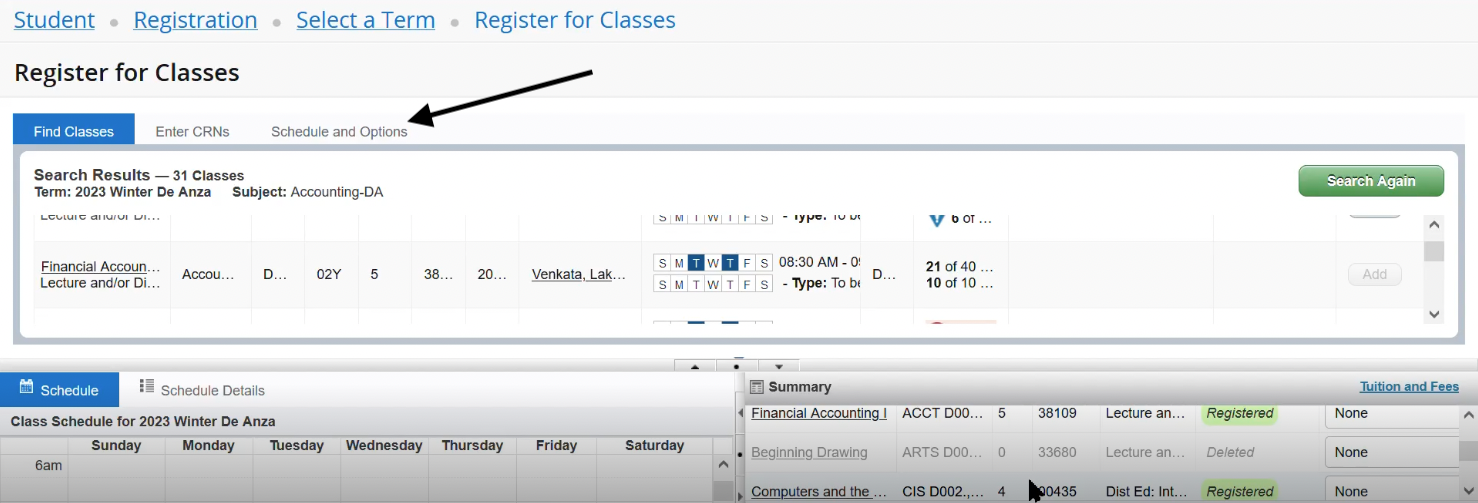
Register for Classes
 Here are the steps to register for classes. If you already know the CRN (Course Registration
Number) for a class you want to take, you can skip Steps 4-6 and go on to Step 7.
Here are the steps to register for classes. If you already know the CRN (Course Registration
Number) for a class you want to take, you can skip Steps 4-6 and go on to Step 7.
Log In Through MyPortal
Use your web browser to go to https://myportal.fhda.edu.
- Log in to your MyPortal account.
- Click on the card for Student Registration
When the Student Registration page opens on your screen, look in the upper left and click the blue link for the Registration Dashboard.
(The previous registration interface, known as "classic," is no longer available for use. It was removed on May 27, 2025.)
![]()
Open the Register For Classes Page
Once you have logged in to the registration system (see the steps above) and have opened the main Registration page, you can click on the link to Register for Classes.
Select a Term
Select the quarter or session for which you are registering, and click Continue.
Find Classes
Find classes by searching for the subject you want.
- Use the Find Classes tab to open the search page.
- You can use the dropdown menu or type in the subjects. (You can search for multiple subjects at the same time, if you wish.)
- Scroll down and click on the Search button to see a list of classes in the subject you want.
TIPS: Other Ways To Search Classes
- If you already know the CRN for the class you want to add, you can click on the Enter CRNs tab and add the class that way. For details, see Add Classes by CRN below.
- You can find CRNs by using the Browse Classes feature or checking the Schedule of Classes on De Anza's website.
- You can do a search just for open classes by using the Browse Classes feature or checking the Schedule of Classes on De Anza's website.
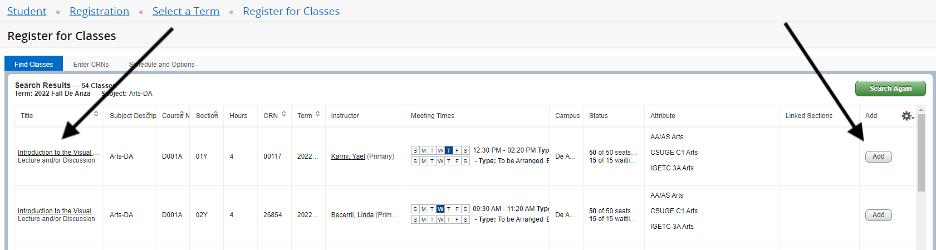
View and Add Classes
When the list of courses appears on your screen, check each column for useful information.
- Title: Click on each course Title to view more information about the course – including required textbooks, prerequisites
and other helpful details. Be sure to read the footnotes for details on how the class will be taught, such as
-
- Whether it will be taught on campus or online – or as a hybrid class that includes both on-campus and online instruction
- Whether online classes will have regularly scheduled meeting times, some scheduled meetings, or no regularly scheduled meetings, with students completing weekly assignments on their own time.
- Whether it will be taught on campus or online – or as a hybrid class that includes both on-campus and online instruction
-
- Meeting Times: Click on the entry under Meeting Times to see the days, times and location of class meetings, as well as the starting and ending dates.
- Status: Look in the Status column and click on the entry for each class to see details about seat availability and spaces on the waiting list.
TIP: Expand Any Column
You can make any column wider or narrower by holding your cursor on the dividing line and moving to the right or left.
Click the Add button in the right-hand column to add a class to your preliminary schedule.
Complete the Registration
IMPORTANT
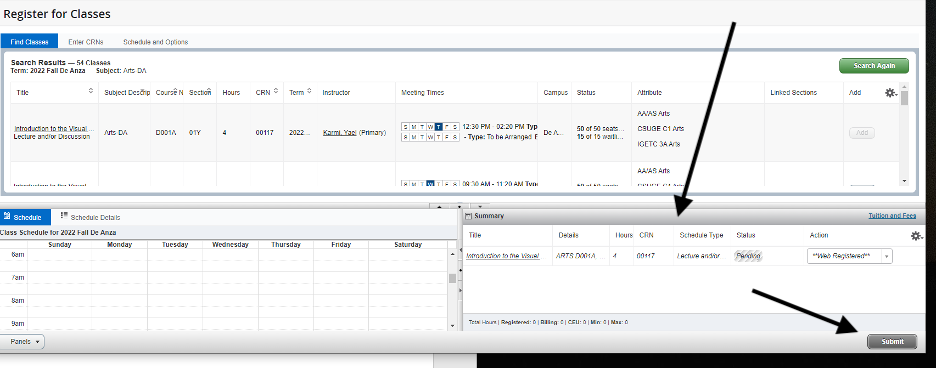
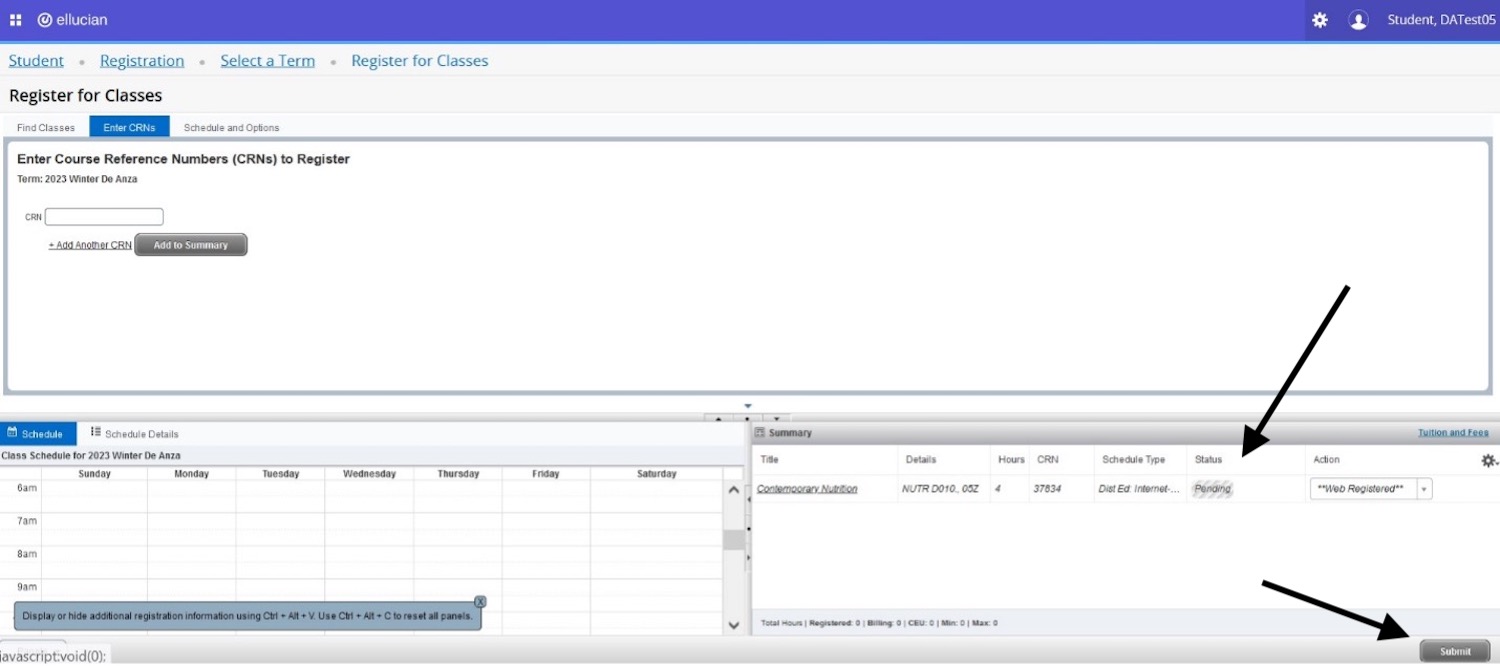
You may see an error message if you have not met a course prerequisite or if there is a registration hold on your account. Be sure to read any error message carefully and contact the Admissions and Records Office if you don't understand it.When you click the Add button, the class will appear in the Summary section in the bottom right area of your screen, and in the Schedule section in the bottom left area of your screen.
- In the Summary section, you'll see the status is "Pending" because you are not yet registered for the class.
- You should also check to be sure the "Action" dropdown menu shows ***Web Registered***
- You then need to click the Submit button to actually register for the class.
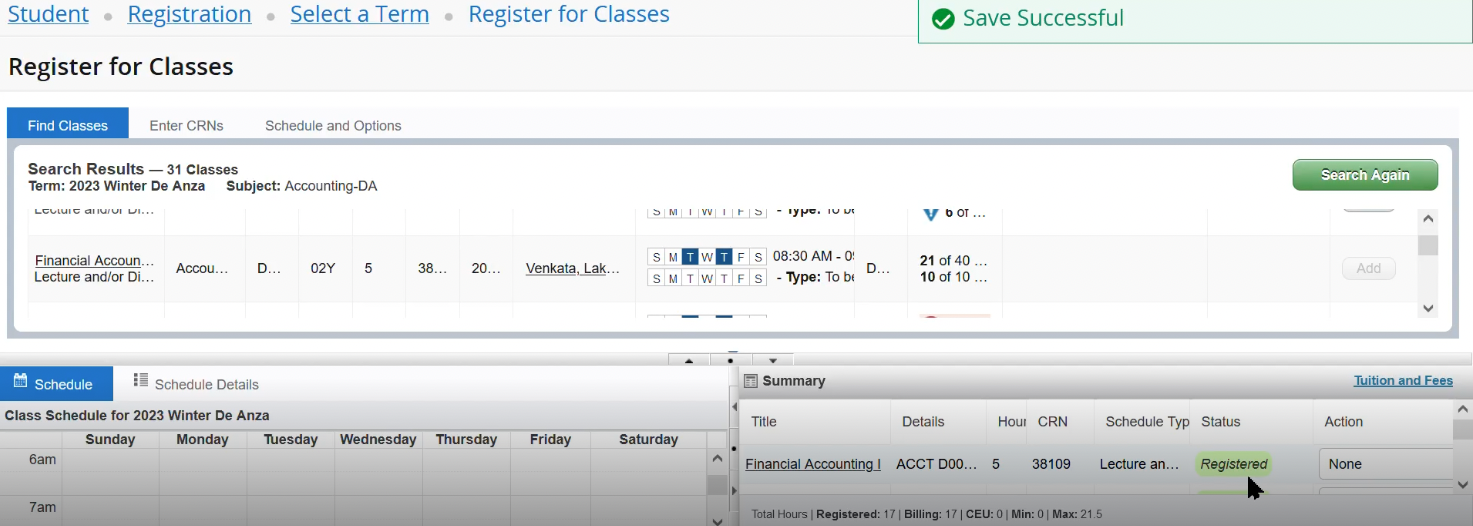
After you click Submit, the status will change to "Registered."
If you change your mind after you register, you can drop the class by opening the Action dropdown menu:
- Click on ***Web Dropped*** and then click the Submit button.
- The status will change to "Deleted."
Add Classes by CRN
IMPORTANT
You may see an error message if you have not met a course prerequisite or if there is a registration hold on your account. Be sure to read any error message carefully and contact the Admissions and Records Office if you don't understand it.You can also add classes if you already know their CRN (Course Registration Number).
TIP: How to Find CRNs
You can find CRNs by using the Browse Classes feature or checking the Schedule of Classes on De Anza's website.
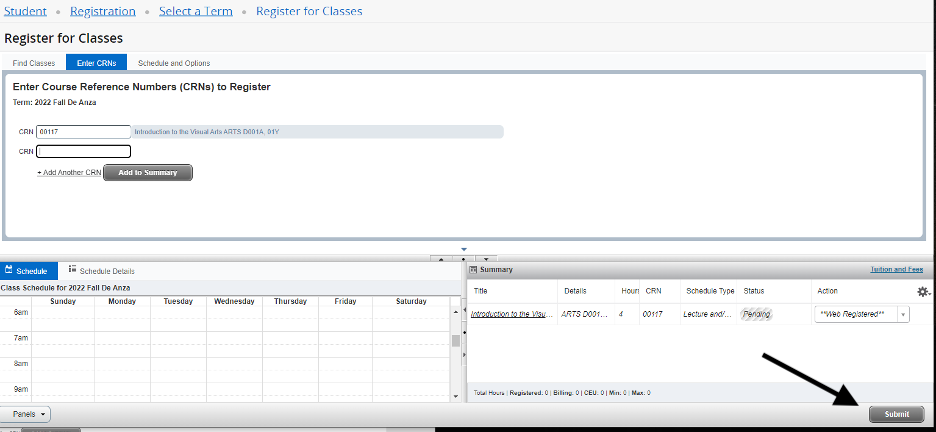
While you're in the Register for Classes section, you can select the Enter CRNs tab instead of the Find Classes tab. After you select Enter CRNs:
- Type in the CRN.
- To add multiple CRNs, click on + Add Another CRN for each additional class.
- When you have finished entering the CRNs, click Add to Summary and they will be added to your registration summary.

- In the Summary section, you'll see the status is "Pending" because you are not yet registered for the class.
- You should also check to be sure the "Action" dropdown menu shows ***Web Registered***
You won't actually be registered for the class until you click Submit.
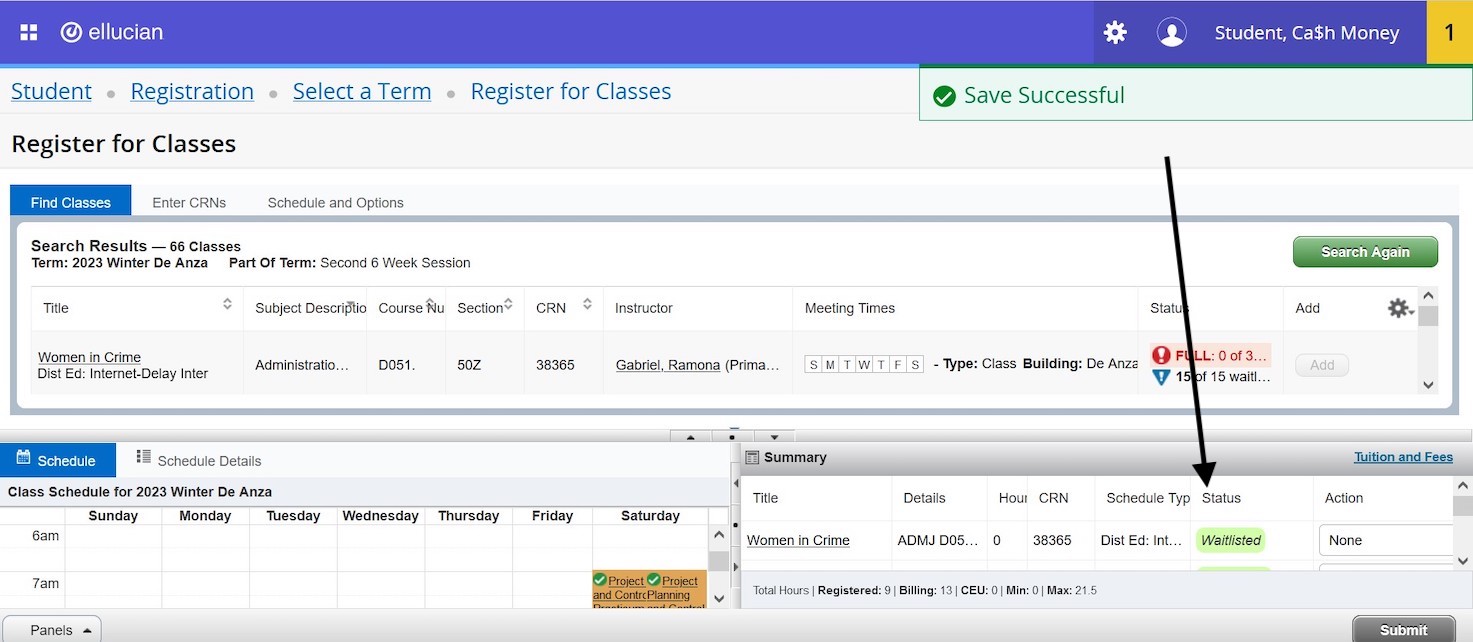
Add Yourself to a Waiting List
You may find that a class you want is already full, which will be indicated in the Status column:
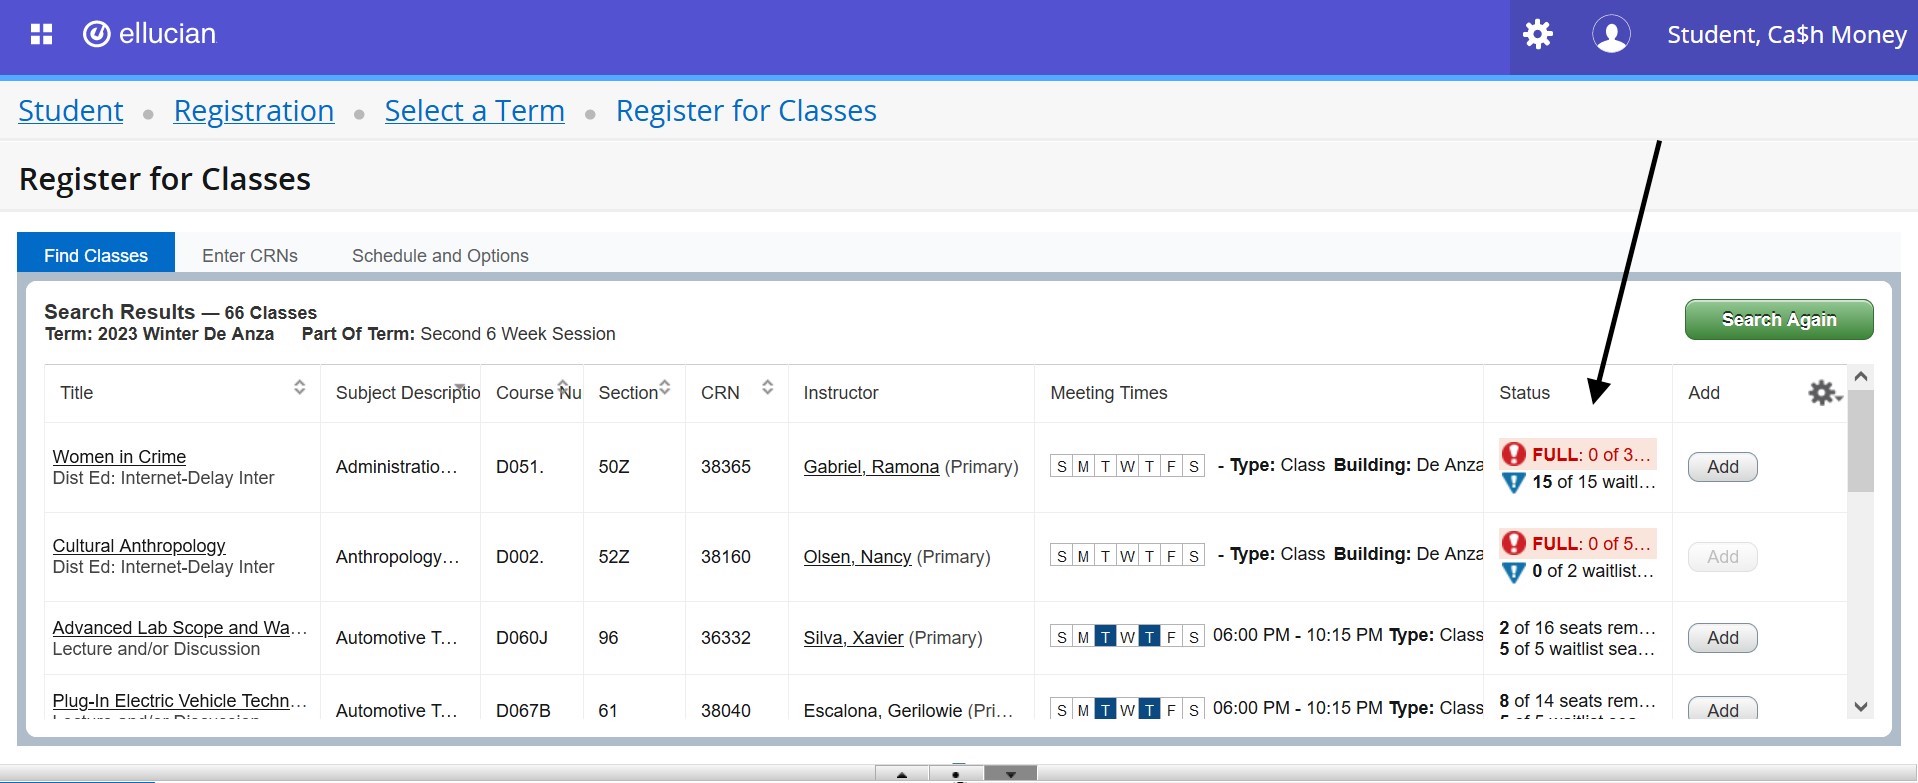
You can check for other sections of the same course, to see if any are open. You can also click the Status field for that class section to see if there are seats available on the waitlist:
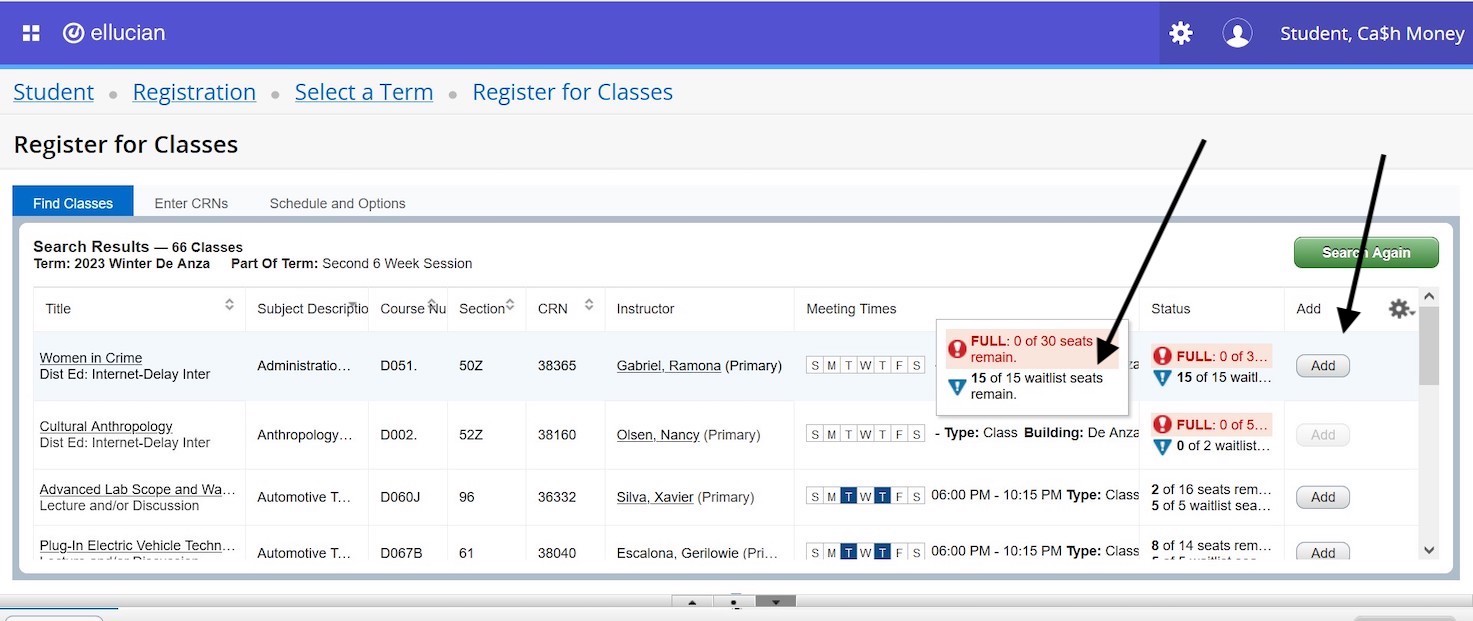
If there are spaces available on the waitlist, you can click the Add button for that class, and the class will be added to your Summary, in the lower right of your screen. Next, you should click the Submit button, and you will see another message about the waitlist appear:
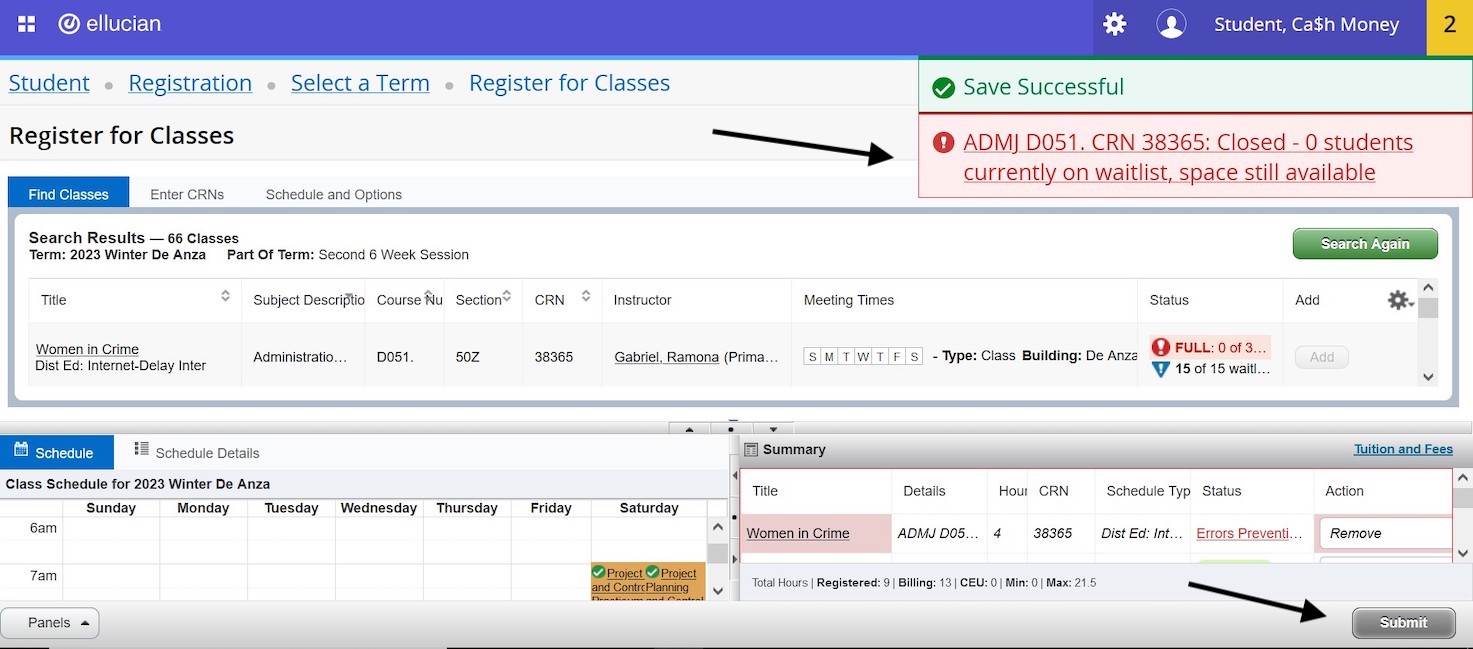
Now, use the Action dropdown menu and select Waitlisted, then click the Submit button again:
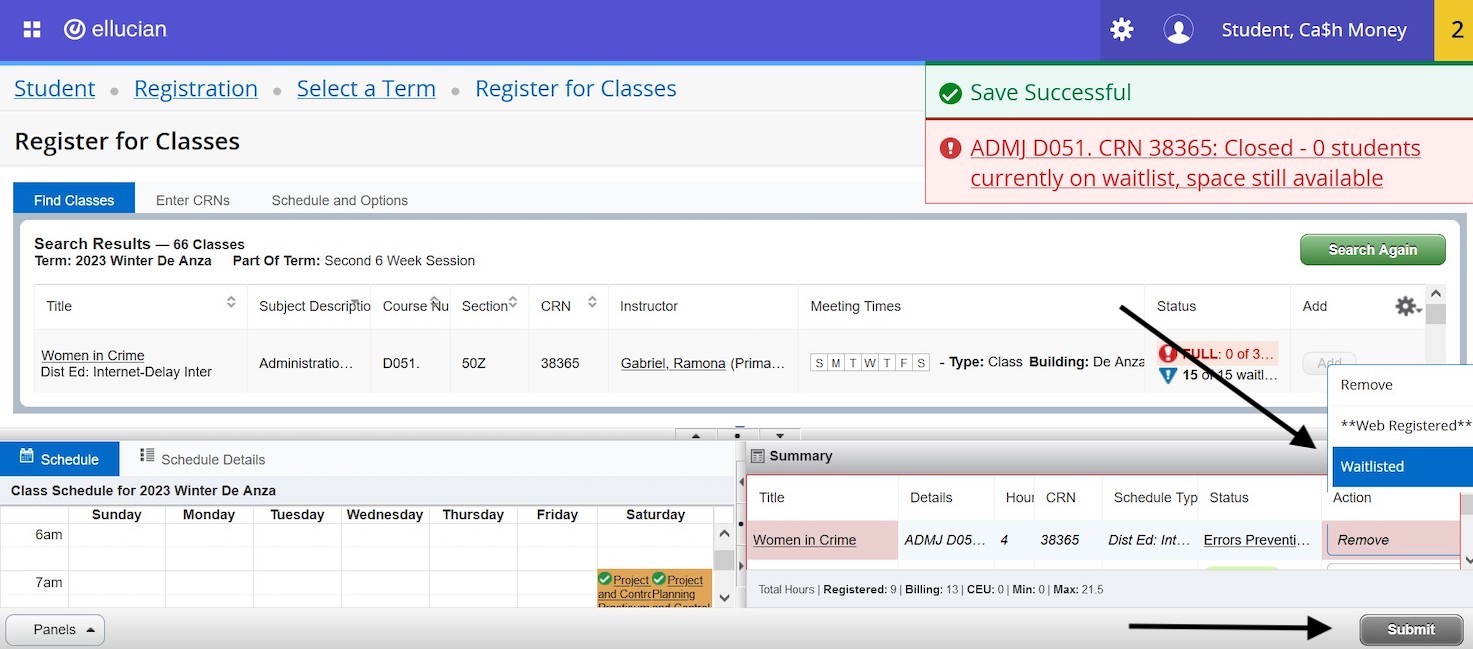
You should see the status change to green, showing that you are now on the waitlist for that class:
Once you're on the waitlist, the registration system will monitor the class for openings and, if a seat becomes available, the system will automatically add students in the order they are listed on the waitlist. If you are added, you will be notified by email.
Note: If you're on a waitlist for a class and later receive an Add Code from the instructor after classes begin, you will first need to drop the class to clear your name from the waitlist, and then add it again. If you don't do this, the system will not display the box where you enter the Add Code.
You can also see your position on the waitlist by checking your schedule details:
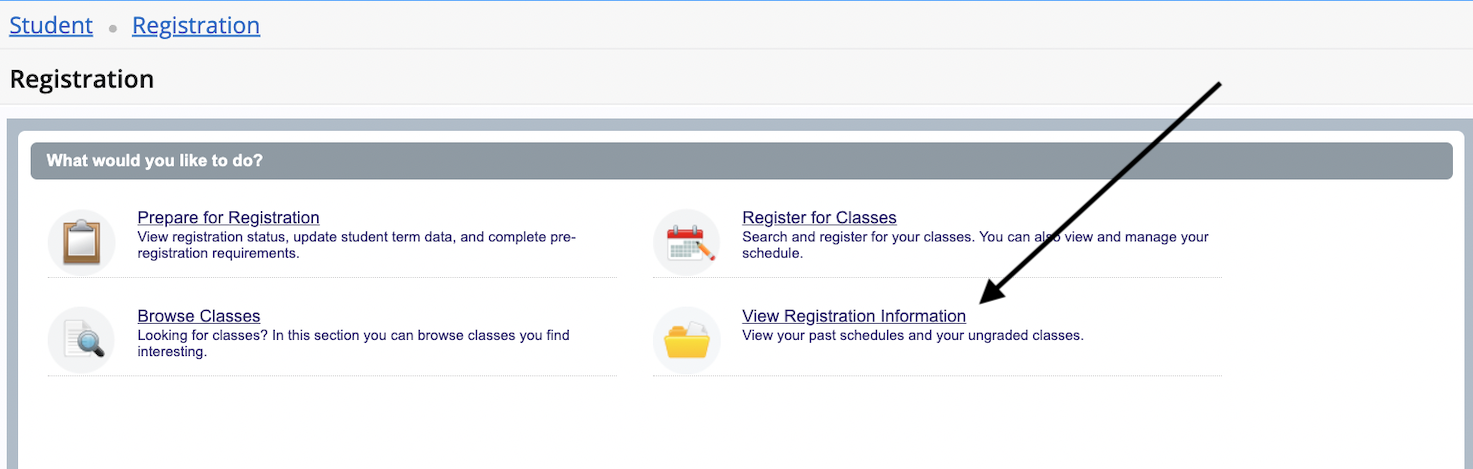
First, return to the Registration Dashboard and select View Registration Information.
Then look under Schedule Details to find the class that you're waitlisted for. You'll see your position listed as a numeric rank.

Drop a Class
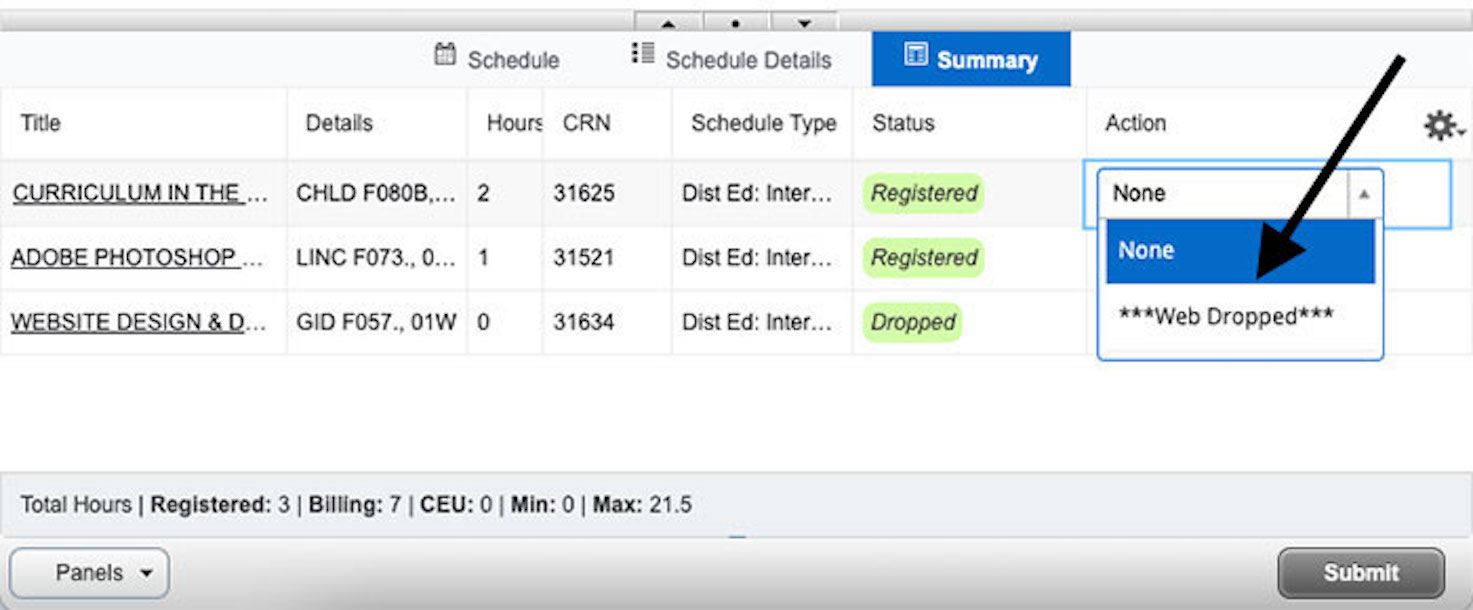
If you need to withdraw from a class, you can go to the list in your Summary of classes:
- Click to open the Action dropdown menu
- Click to select ***Web Dropped***
- Click the Submit button
- The status will change to Deleted
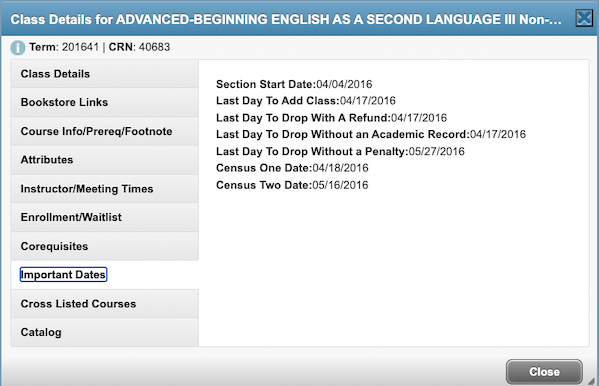
TIP: Check the Deadline to Get a Refund
The deadline to drop and get a refund is not always the same for every class. If you think you might drop a class, be sure to check the deadline to drop and still get a refund:
From the Registration Dashboard, click on View Registration Information and then click on the Active Registration tab.
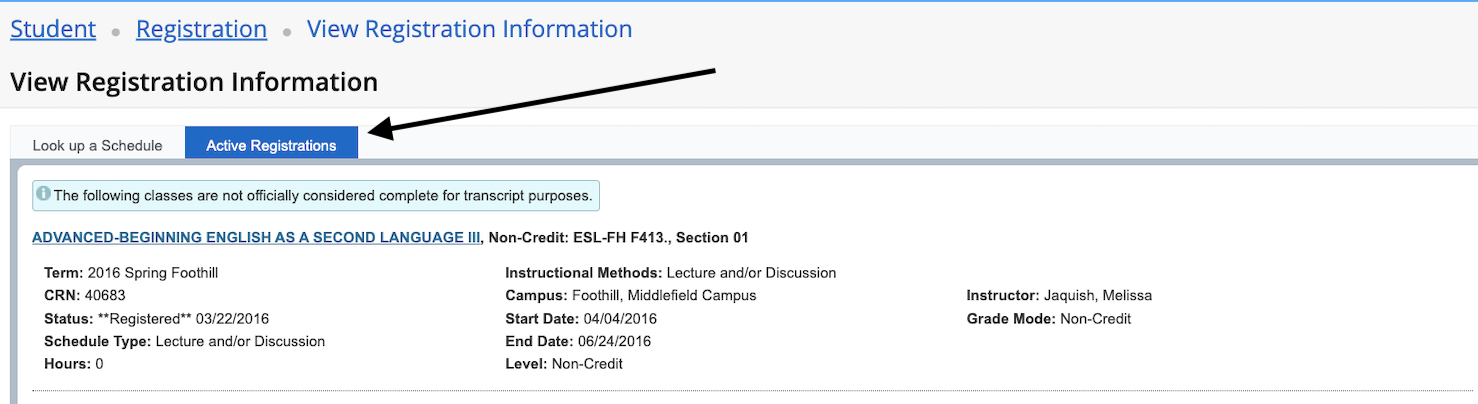
Next, click on the name of the class you might want to drop. This will open a pop-up window labeled "Class Details."
Now, click on Important Dates to see the last date that you can drop the class with a refund.
Select Grades or Pass/No Pass
For courses that offer this grading option, you can choose traditional grades (A, B, C etc.) or Pass/No Pass by clicking on the Schedule and Options tab.
When the Schedule and Options display opens, look for the course and then open the dropdown menu in the Grade Mode column.
- Click to select either Normal Grade Rules or Pass/No Pass.
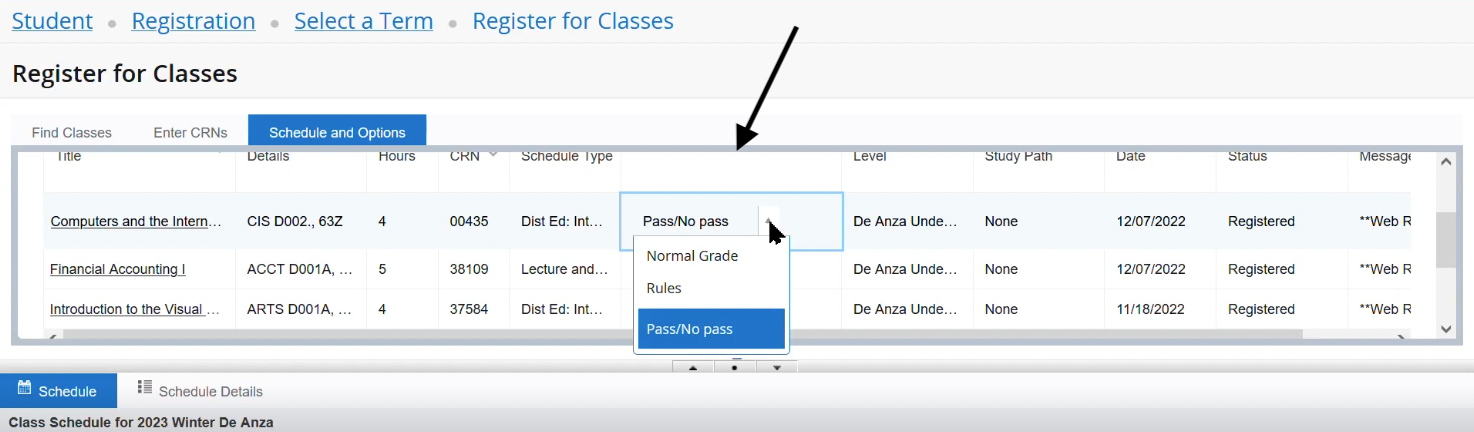
Remember: There are important issues to consider before selecting Pass/No Pass. Consult the Pass/No Pass webpage for more information.
Check Deadlines and Pay Fees
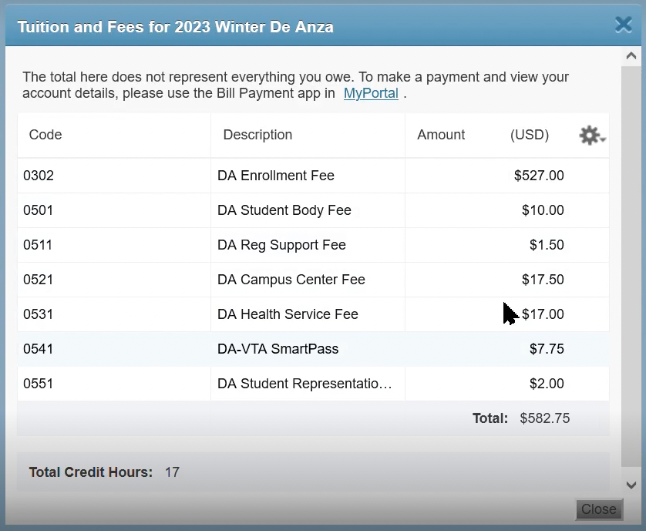
Remember to check the deadlines for dropping the course, and be sure to pay your fees. Click on the blue Tuition and Fees link to see what you will owe.
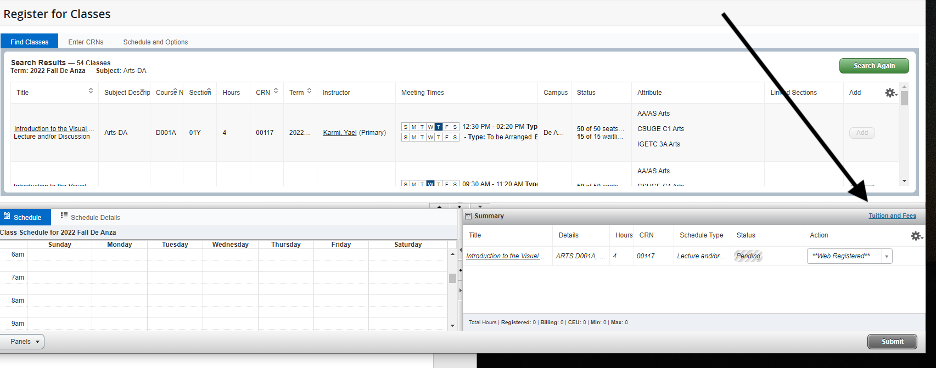
When you click the Tuition and Fees link, a list of charges will appear.
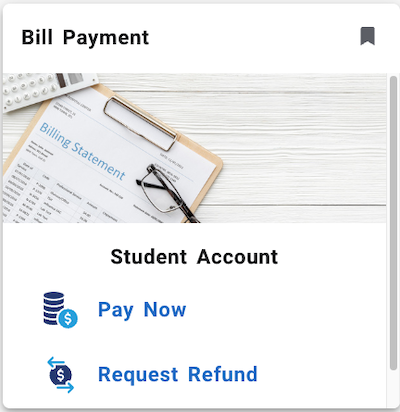
You can pay your fees online: Use the Bill Payment Tool on the Student Registration landing page:
![]()
 Or you can go to the cards page in MyPortal and click on the card for Bill Payment, then follow the instructions on your screen.
Learn about payment policies and methods of payment at the Cashier's Office
Need help with college costs? Visit the Financial Aid Office to learn all about grants, loans, scholarships and the De Anza College Promise
Add Classes After the Quarter Has Started
You'll need an Add Code: You must attend the first class meeting – or email the instructor – and ask for an Add Code if space is available. You can find the instructor's email address by checking the campus directory.
Log In Through MyPortal
Use your web browser to go to https://myportal.fhda.edu.
- Log in to your MyPortal account.
- Click on the card for Student Registration
When the Student Registration page opens on your screen, look in the upper left and click the blue link for the Registration Dashboard.
(The previous registration interface, known as "classic," is no longer available for use. It was removed on May 27, 2025.)
![]()
Search for Open Classes
You can search for open classes by using the Browse for Classes link.
Be sure to make a note of the CRN for the class you want to add, so you can enter that number when the time comes. (You will also need an Add Code from the instructor.)
When you search in Browse for Classes, you can filter the results so that only open course sections are displayed. Do this by checking the box for "Open Sections Only."
Open the Register for Classes Page
Once you have the CRN, you can click on the Registration link at the top of the page to return to the Registration Dashboard.

Now, click on the link to Register for Classes.
Select the Term
Select the quarter or session for which you are registering, and click Continue.
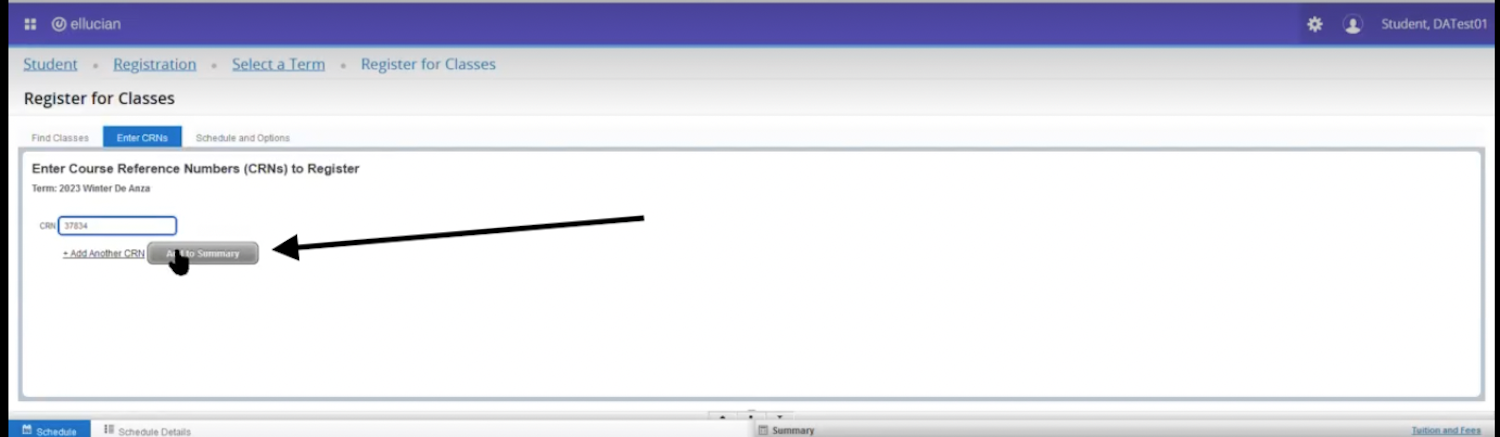
Use the Enter CRNs Tab
Select the Enter CRNs tab and then type in the course CRN.

Click on Add to Summary
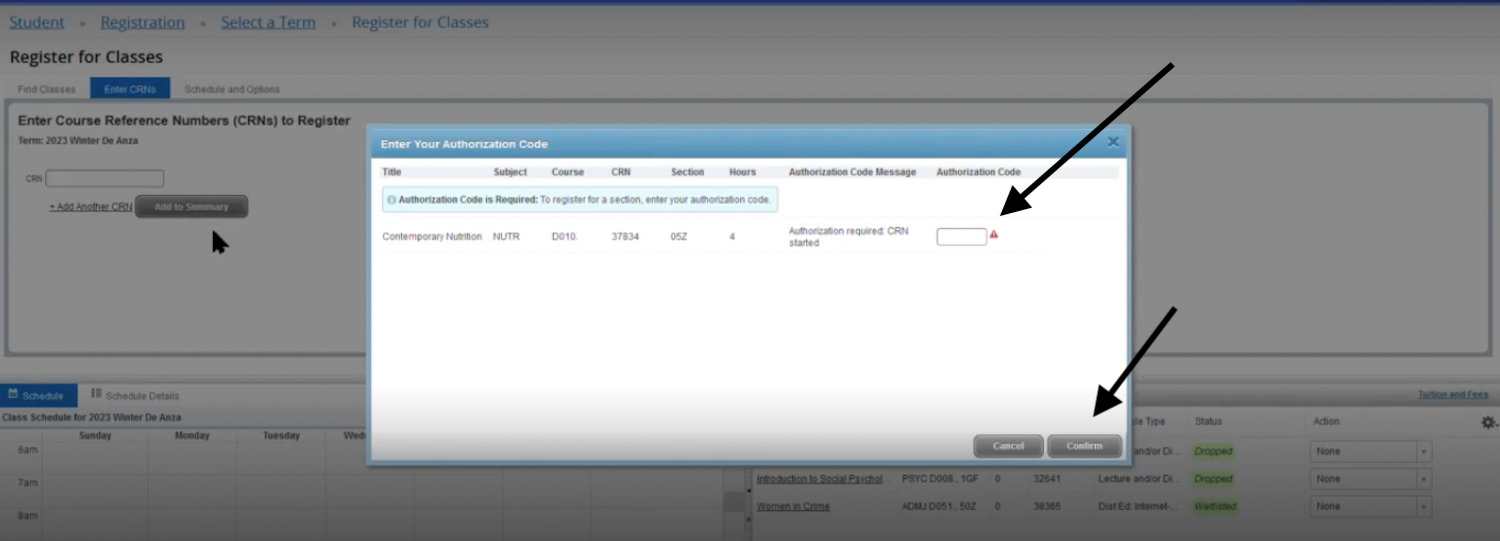
Enter the Add Code When Asked
You’ll see a box pop up with the heading: Enter Your Authorization Code. This is where you type in the six-digit Add Code, and then click on Confirm.
Some useful tips:
- If the class meets in person, you should go to the first class meeting and ask the instructor for the Add Code.
- If the class is taught online, you can email the instructor to request the Add Code. You can find the instructor's email address in the campus directory.
- Add Codes may contain numerals and letters. If you get an error message and your Add Code appears to contain a numeral 0 or 1, try changing those to the letter "O" or "L," or try the lowercase "o" or "l."
Note: If you're on a waitlist for a class and later receive an Add Code from the instructor after classes begin, you will first need to drop the class to clear your name from the waitlist, and then add it again. If you don't do this, the system will not display the box where you enter the Add Code.
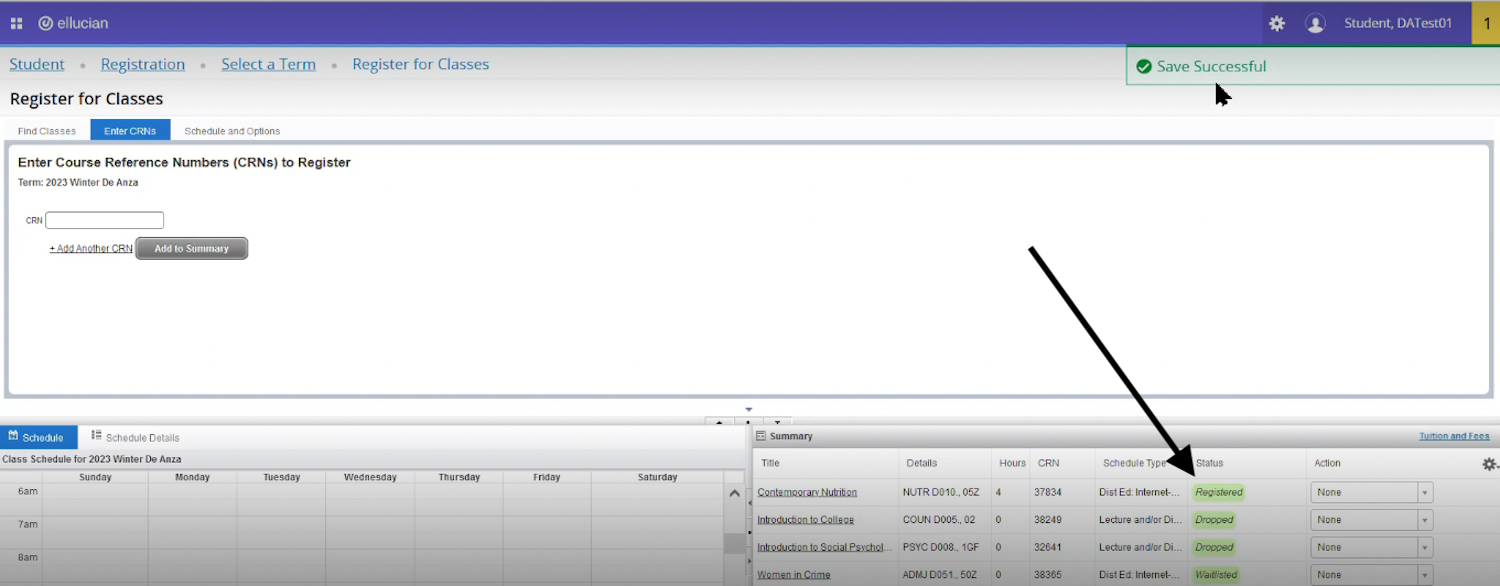
Complete the Process
You’ll see the course appear in your Summary box with the Status showing as Pending.
Remember that you still need to click the Submit button in the lower right corner of the Summary box
That should change the Status to Registered and you should see a message that says Save Successful.
Check Deadlines and Pay Your Fees
Remember to check the deadlines for dropping the course, and be sure to pay your fees. You can pay your fees online by using the Bill Payment Tool on the Student Registration landing page:
![]()
Or you can go to the Apps page in MyPortal and click on the tile for Bill Payment, then follow the instructions on your screen.
Learn about payment policies and methods of payment at the Cashier's Office
Remember to Pay Your Fees!
- Learn about payment policies and methods of payment at the Cashier's Office
- Need help with college costs? Visit the Financial Aid Office to learn all about grants, loans, scholarships and the De Anza College Promise